Teach on Genius
October 20, 2020 2023-12-16 21:37Teach on Genius
Become an Instructor
Teach millions of students around the globe on Genius. Work from anywhere and anytime. Register now for FREE.

Earn Money
Help People
Work Anywhere Anytime
Course Building Guide
This guide will help you build a professional course and publish it to the world. We will help reviewing the course and provide feedback to ensure your course success.
Let's start

- If you have not signed up yet, please sign up through the button below.
- Go to your dashboard and ensure completing your profile information, photo and preferred payment method.
- Please continue following the steps below.
Choose Your Course Topic & Category
If you are here, then you have valuable knowledge and expertise to share with others. That is the topic or subject to teach on Genius. once you found the topic, proceed with the guidelines below.
Prepare course content
Now you know your topic. Start preparing your course content.
We are aware that videos production can be a hard task for some instructors. So to keep it simple, your course can be either a video, audio, written materials, or a combination of all. This means a course could be build in the format that you would prefer. We can provide you with course templates and more to help you create the best stunning course. Below are examples of different formats that you are welcome to choose from.
- Inro/Promo video of the course 30 - 90 seconds and a number of short videos as per the structure below.
- Inro/Promo video of the course 30 - 90 seconds. Short videos of few seconds introducing the learner to course modules or lessons, then continue the written material with voice/audio recordings explanation of the text.
- Inro/Promo video of the course 30 - 90 seconds. Short videos of few seconds introducing the learner to course module or lesson, then continue the written material.
- Inro/Promo video of the course 30 - 90 seconds. Full voice/audio recordings explaining the written material.
- Inro/Promo video of the course 30 - 90 seconds. Full written material without video or audio audio.
- Make your own combination of the above as you find relevant and convenient.
- Remember we are always here to help, our aim is to make your teaching journey as easy and simple as possible.
Further below is an example of a course structure. During your course building process it is recommended to follow the course quality assurance checklist, click the link below. Course Quality Assurance Checklist.
Course Duration: The minimum course duration should be 30 minutes with no maximum limit. However, if you would like to deliver a comprehensive course, we encourage you to split the course over three courses for three learner's levels; beginner, intermediate and advanced. You could also create a series of courses on a specific topic.
Course Intro Video
This video will be used for promoting your course online through professional and social media. We can help you with this part if you need. It needs to be as short as 30 seconds and up to 90 seconds maximum and should include the following:
- Attract your audience in an exciting way, tell your audience;
- The objectives and importance of the course for them and how it will benefit their professional or personal life.
- Briefly introduce yourself and your area of expertise, then invite them to start the course.
Course Outline or Contents
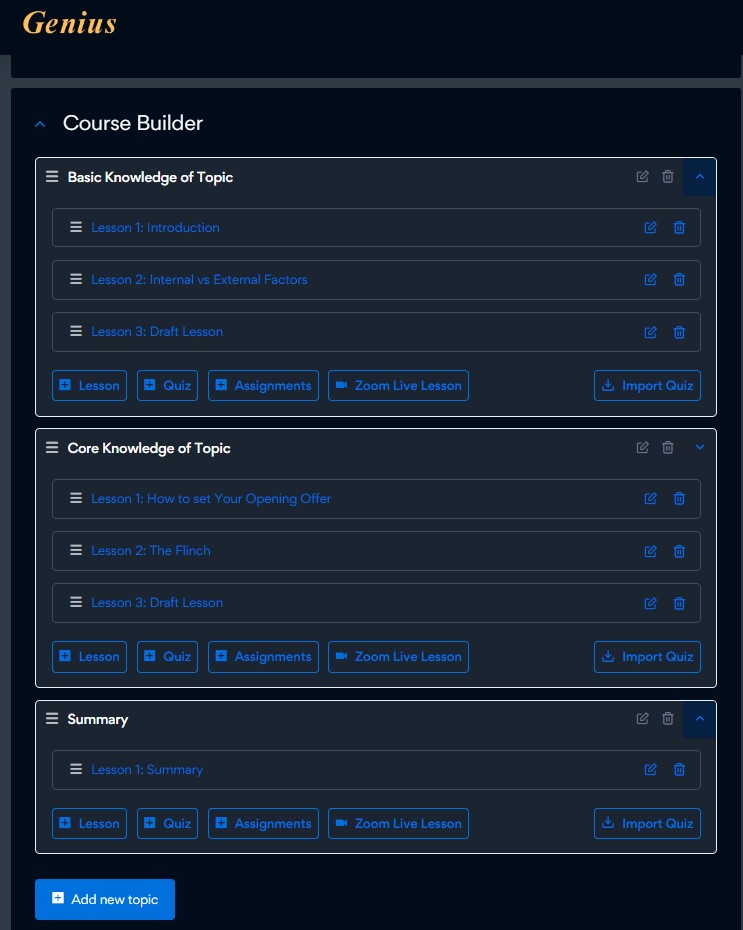
This section should contain the course outline or table of contents of the course.
Then course needs to be in the form of modules or lessons, depends on your intended structure. Further below is an example of that structure.
Summary
End with a 1 - 10 minutes video, audio, written, or combination summarizing the main points and outcomes of the course. If you have an intermediate or advanced level courses, please recommend your learners to take their learning to the next level by enrolling in those courses.
References
If you obtained any information from any sources such as books, articles, or websites, please add a References list on an additional slide at the end of your course to list the sources of information including the authors' names to ensure preserving the copyrights.
Below is an example of how your actual course may look like. The structure is not strict to the below.
Course Attachments
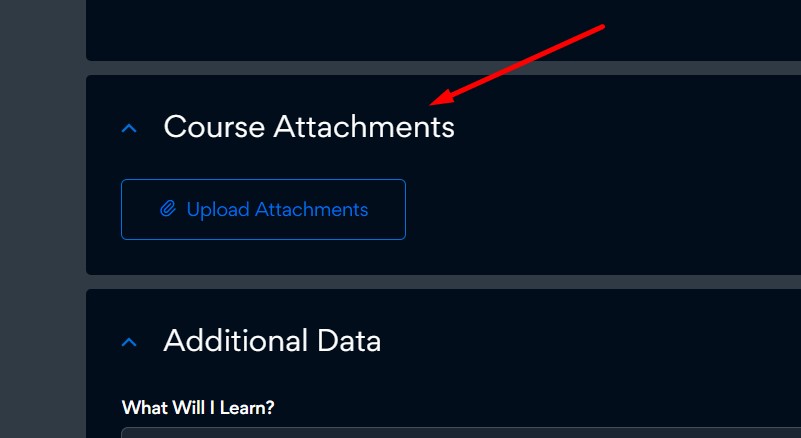
These attachments are any additional materials that you would support the learning process.
Quiz/Assignment
Any number of questions that matches the course content. It could also be an assignment or a project depending whatever is relevant to your course.
Certificate
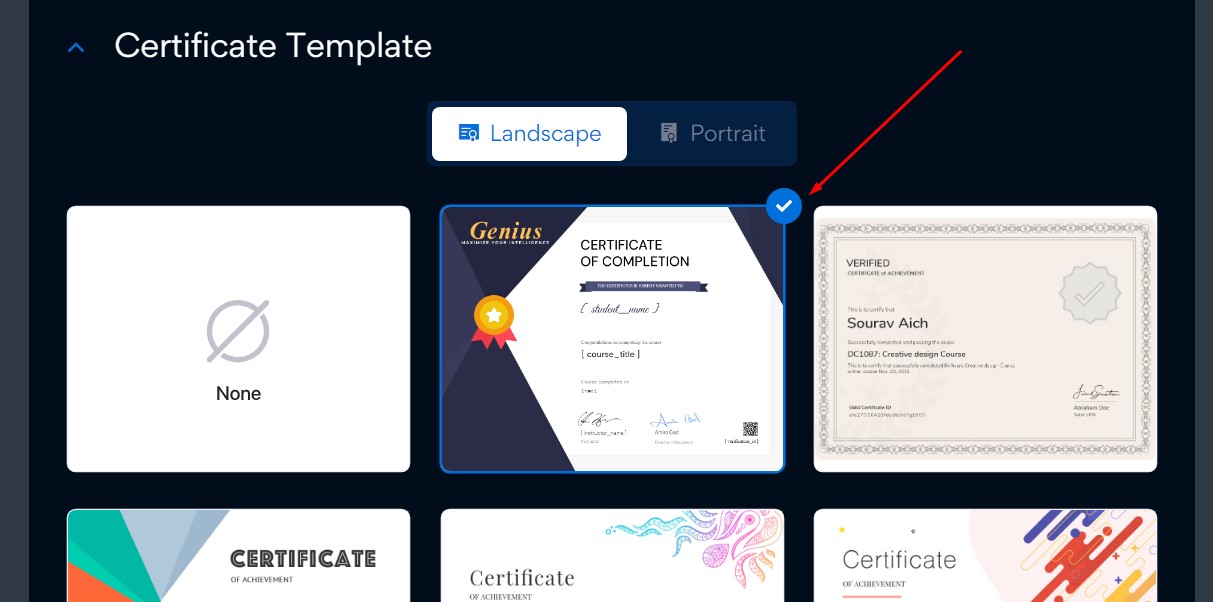
Please ensure using the published certificate template that has "Genius" logo on it, shown below. Please do not use any other template. The other templates are still in development and not ready for usage. .
Move to Step 2 'Build your course' section.
Let's build your course

Technical Requirements
- Hardware: The video production is not limited to any specific hardware, however, you may use a smartphone and a background noise cancelling microphone. Lighting is also very important so ensure there is sufficient light when producing your video.
- Genius supports MP4 video files of up to 512 MB size for each lecture.
- Video quality: a minimum resolution of 720px or higher is required for the best learner experience.
Communication Style
- The instructor should should not communicate in slang language and present in a professional style.
- Instructor must provide their own content and visuals not to breach copyrights.
Guidelines
- The Course Quality Assurance Checklist will help you through building your courses as well as a final quality check before publishing in Step 3, here is the link Course Quality Assurance Checklist
- Once you complete your videos, go to your dashboard.

- Create a new course by clicking on "Add A New Course" button on the top right side on your dashboard. The course builder will open with a new course.

- Fill out as much information as you could on the course builder. Now you know your topic, so identify the category of your course and select it from the dropdown menu. You can also go to the categories menu on Genius website menu home page and select it in the course builder. If you cannot find the category on the list, please contact us using the messenger live chat bubble on the bottom right side of your screen and request adding your category to the menu while you prepare your course.
- You can always save the course and continue at anytime. Your course will be saved in the drafts.

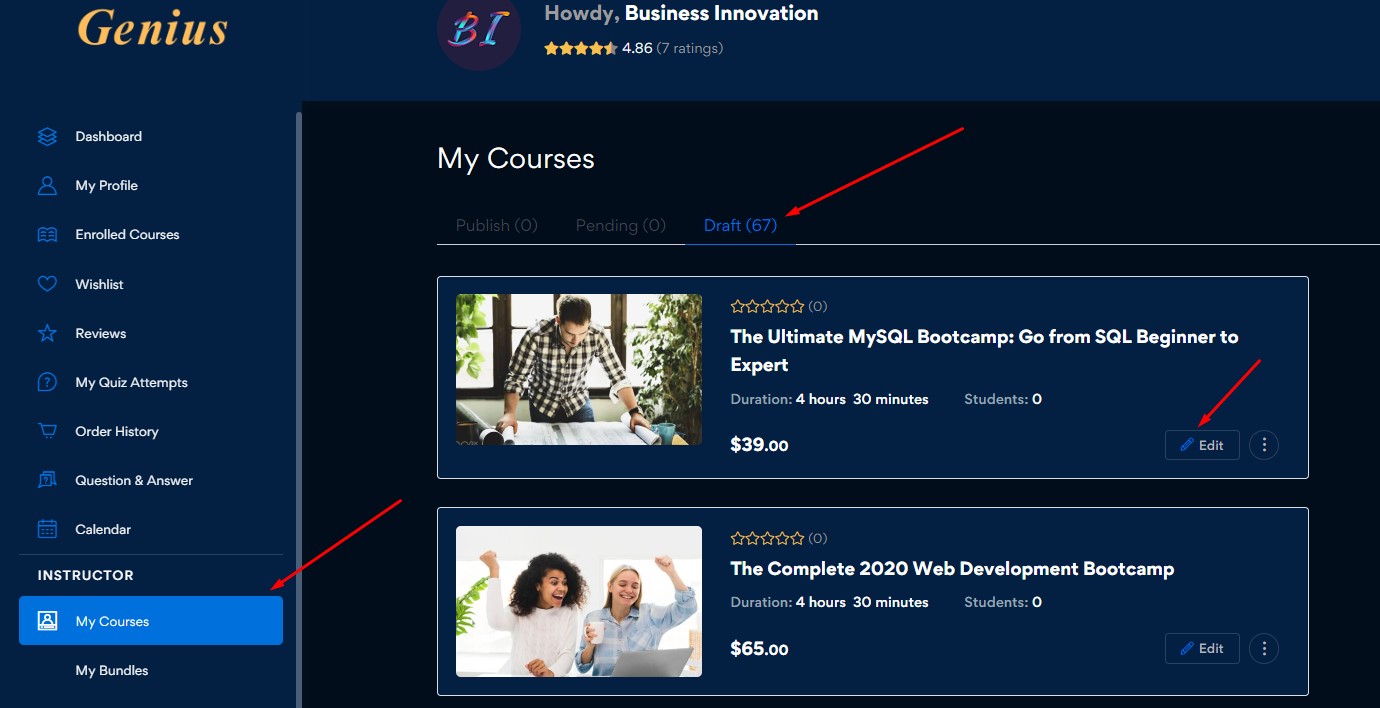
- Here is how to find your draft courses and edit them. Go to "My courses:, click on "Draft", then click on the "Edit" button.
- On the course builder try to fill all the information required.
- Start uploading the course material and videos.
To edit each lesson and add videos click on the edit button shown below.
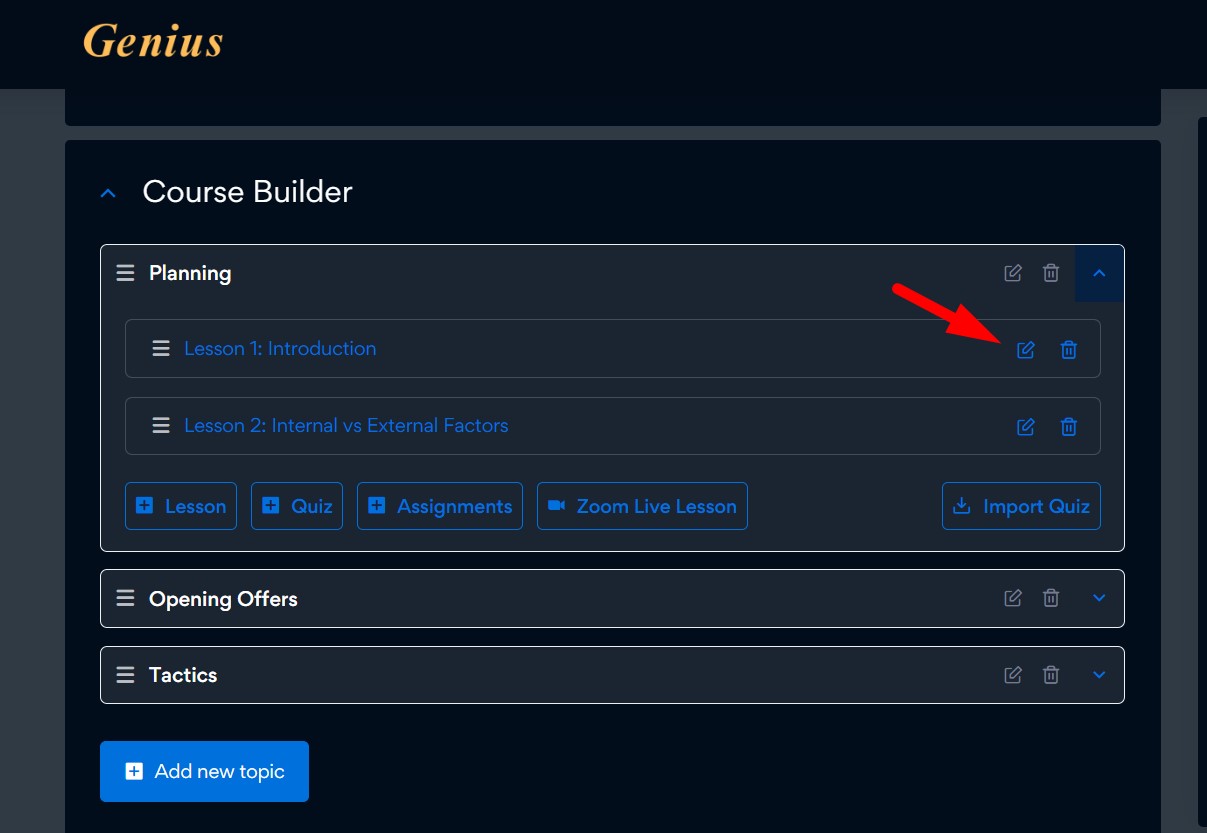
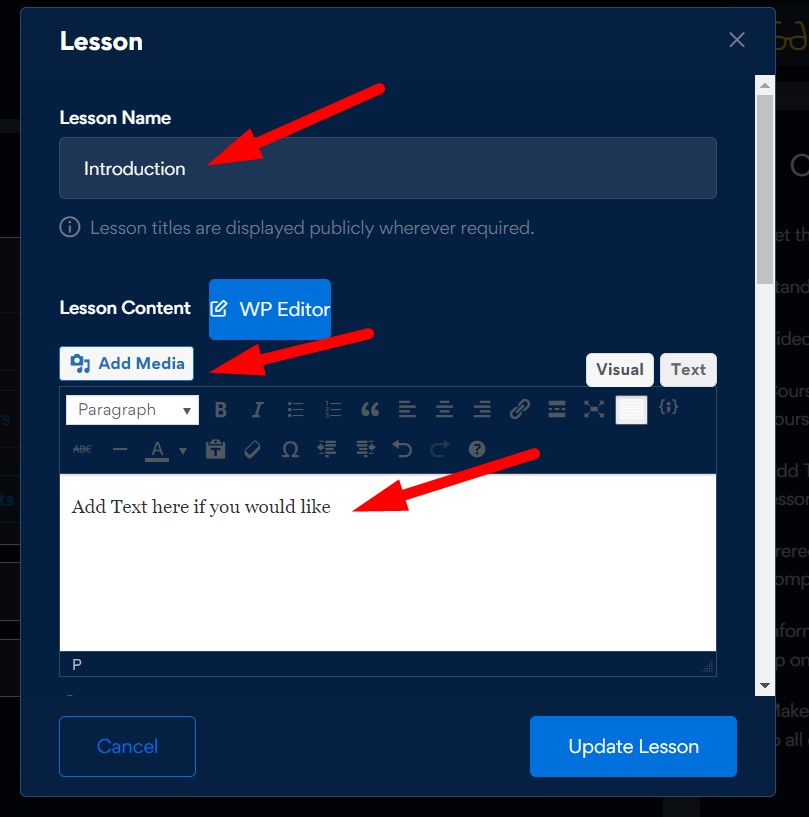
To add lesson contents; type the lesson name and add text in the space shown below.
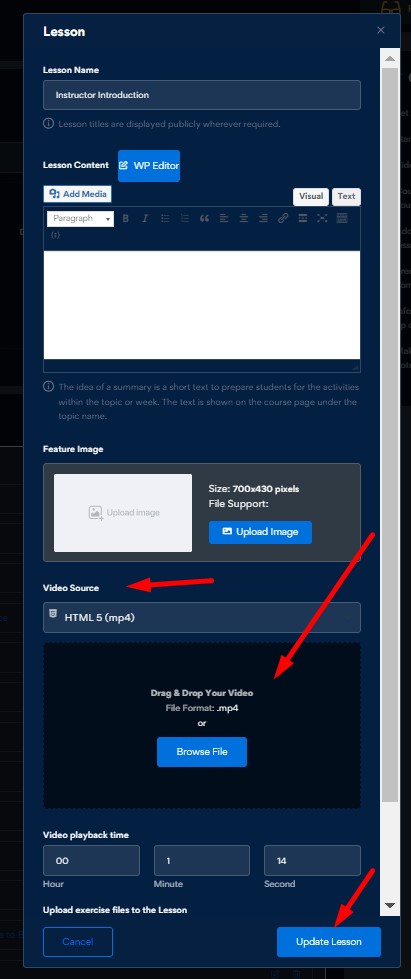
- Scroll down to the video source and browse the video lesson to upload from your computer.
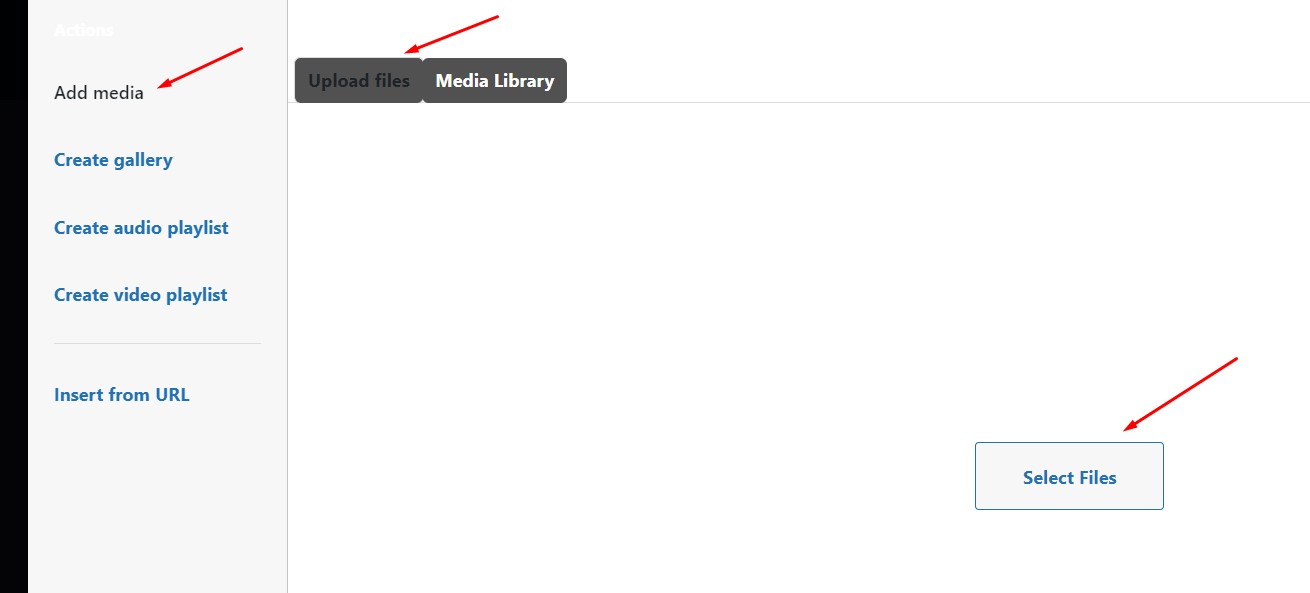
- The Media Library will open, from the sidebar click on "Add media", then click on "Upload files".
Click on "select files" tab.
Select your video and wait for it to upload to the library, once upload is completed, click "Insert into post" tab on the bottom right corner of the window.
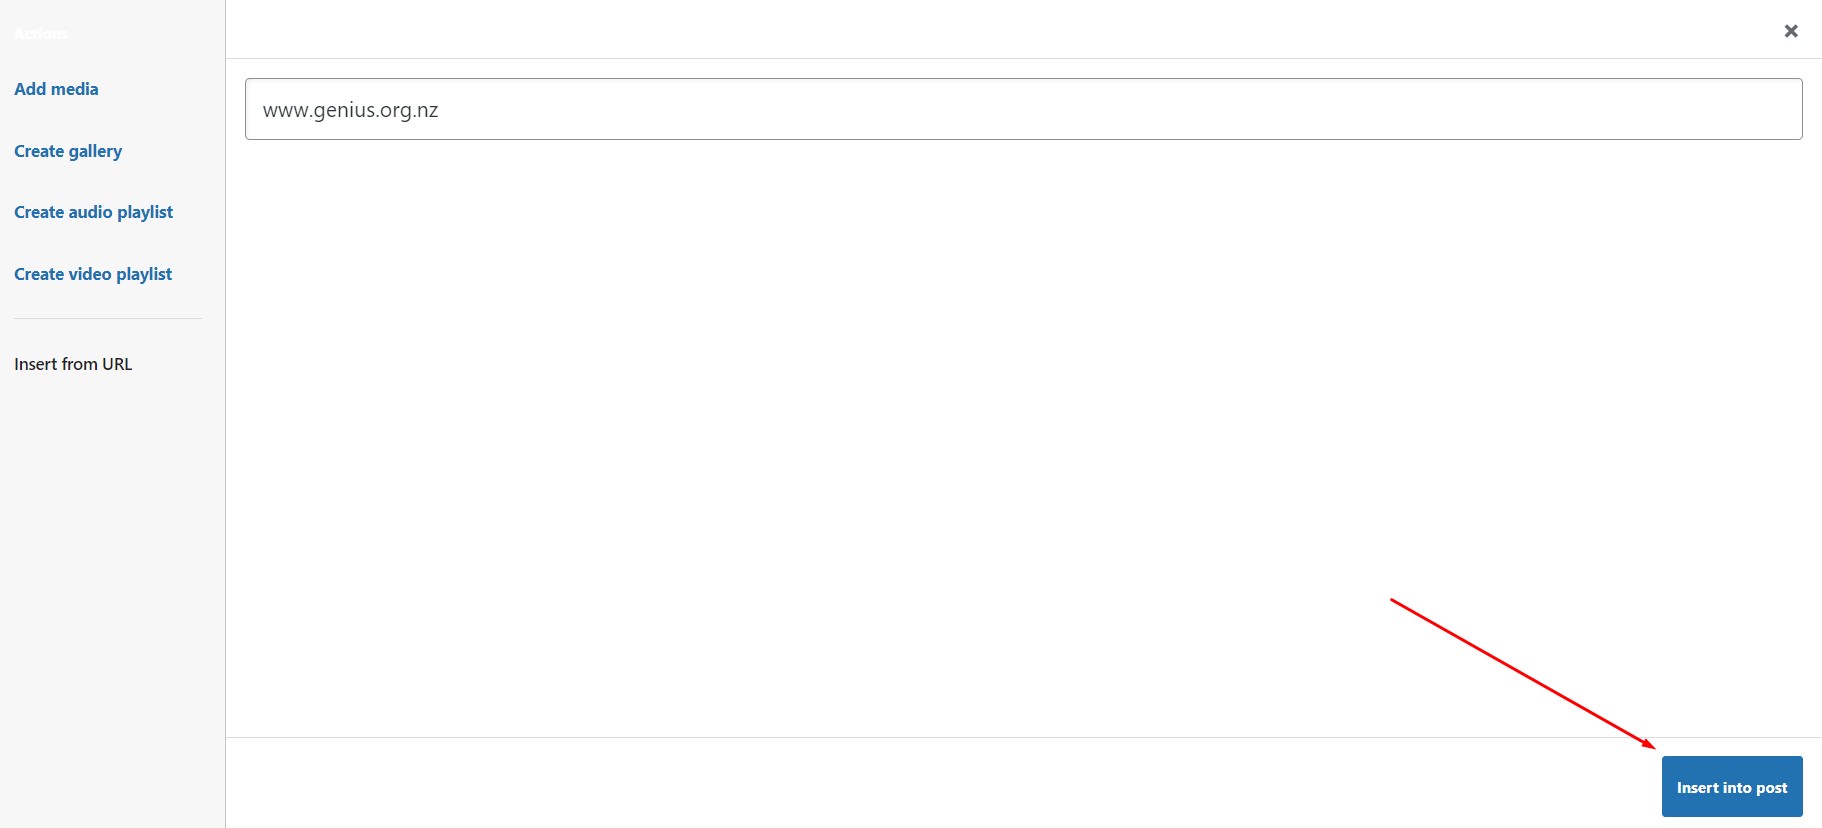
- The video file will be uploaded, then click on "update lesson".

- If you would like to add Power Point Presentation or a PDF format instead of video recordings, follow the next steps.
- The file will need to be saved as separate images, on the menu bar click on "File" tab.
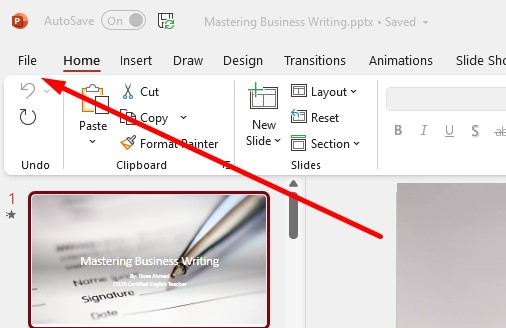
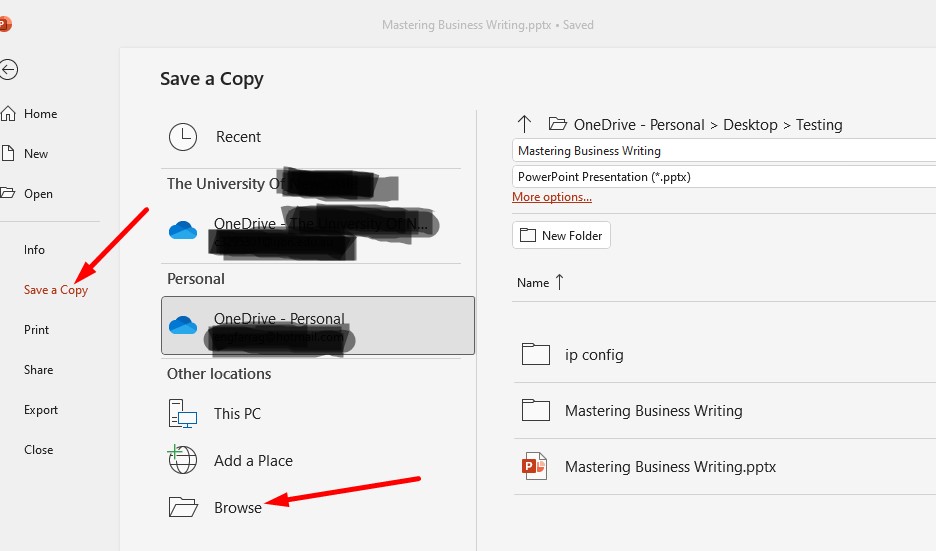
- Select "Save a Copy", then click on "Browse".
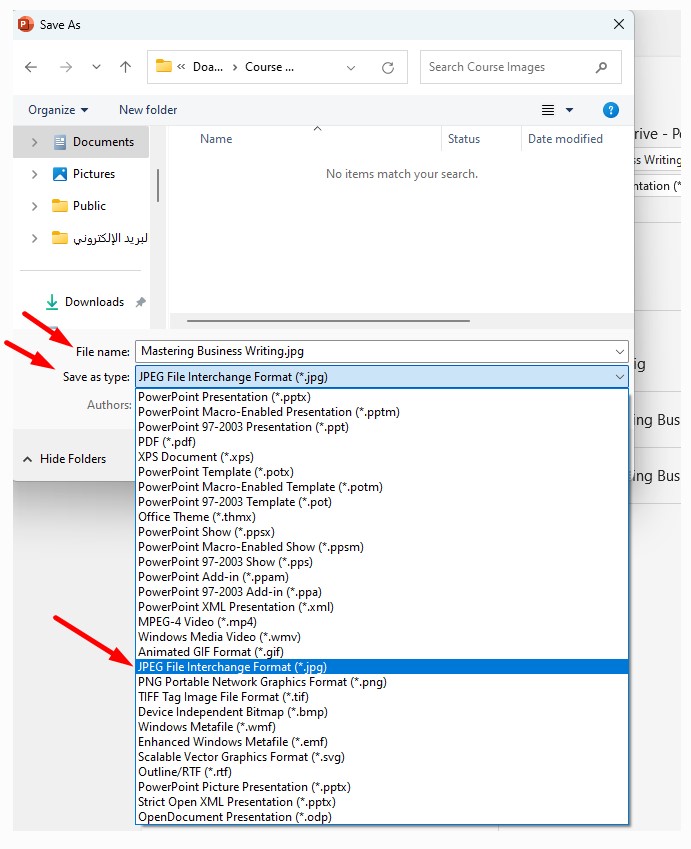
- From the explorer select the file you would like to save the images in. Choose the file type as JPEG File Interchange Format (*.jpg).
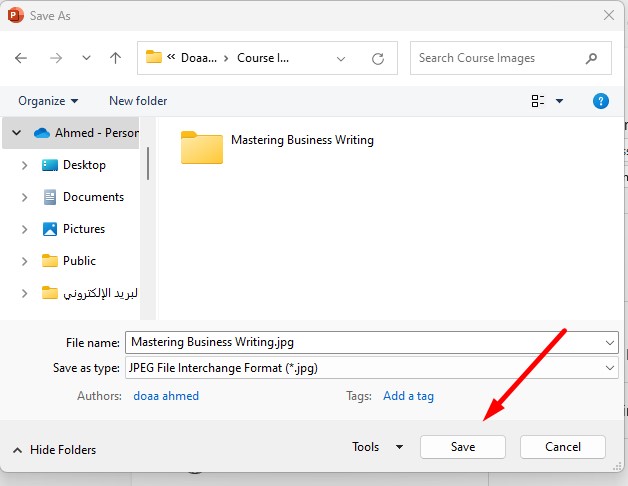
- Click on "save".
- Select "All Slides" to save each slide separately in the folder selected earlier.

- Now go back to your course builder to the lesson intended and click on "edit".

- On the popup window shown name your lesson, then scroll down to "Feature Image" section and upload image to each lesson according to your course structure. Repeat to upload slides to each lesson.
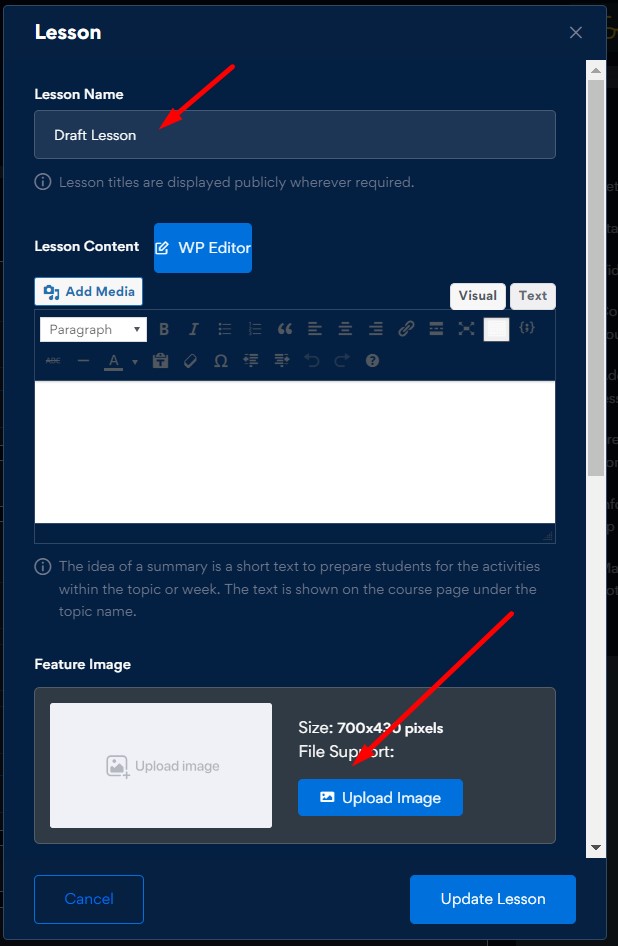
- Click "publish course" on the top of your screen.

You can attached supplementary material to the the course attachments section if required
 .
.Google Meet or Zoom are are supported by Genius. However, feel free to use any other platforms independently. Zoom setup is required on your instructor dashboard, go to your dashboard, on the left side menu, click on Zoom, follow the integration link. On Zoom website, sign up for an account or login into your own account. Get the API keys and enter them on your dashboard to connect.
- Again, please ensure using the published certificate template named "Genius Certificate" not any other template. The other templates are still in development and not ready for usage. Please click the link below to view certificate for your reference. Certificate to use
- If you have any questions please through the link below; Contact Us. You are also welcome to drop us a message through the live chat on messenger on the right bottom side of the screen.
Well done. Move to Step 3 'Publish to the world' section.
Go live

If you have not signed up yet, please do so now, then follow the guidelines on on this page.
Well done, you have finished the hard work. Now take few minutes to double check the course quality guided by the quality check list, link below. Course Quality Assurance Checklist Once checked all the points, submit your course for review and leave it with us.
Now it's Genius turn to review your course
Genius team will review, provide feedback for modifications if necessary. If your course is ready to publish Genius team will approve and publish your course for you. Genius instructor support team will always be next to you to help through your journey.
Marketing Tips
- Offer discounted courses to attract more audience and drive sales. You will come across the discount function while building the course on the course builder.
- In addition to Genius's marketing efforts; once your course is published, you are encouraged to promote it on your social media network, Facebook, Instagram, Twitter, Linkedin etc. You can use the course link to share it on your social media to direct your audience to your course directly. Simply copy the course link on your web browser and add it to your post to invite your audience to view and enroll in your course. Follow audience engagement on your social media networks. If you need help creating your posts, please do not hesitate to contact us.
You will receive email notifications when a student enrolls in your course. You can also monitor your course enrollments on your dashboard.
Congratulations, you can think about your next course to publish.
We're here to help
Explore our Course Building Guide to help you start your teaching journey. Genius Support Team is always ready to help.


